

User Guide#
Reading and writing genetic data#
Installation#
Sgkit can read standard genetic file formats, including PLINK and BGEN. For reading VCF, please use the bio2zarr package.
If sgkit has been installed using conda, support for reading BGEN and PLINK is included.
If sgkit has been installed using pip, then support for reading these formats is not included, and requires additional dependencies, which can be installed as an “extra” feature using pip, as follows.
To install sgkit with BGEN support:
$ pip install 'sgkit[bgen]'
To install sgkit with PLINK support:
$ pip install 'sgkit[plink]'
Converting genetic data to Zarr#
There are broadly two ways of loading genetic file format X for use in sgkit:
a
read_Xfunction to read the file directlya
X_to_zarrfunction to convert to Zarr first
Which one to use depends on the size of the input, as well as the file format (not all file formats have both options).
Generally speaking, the read_X functions are convenience functions that are suitable
for small input files, or where the cost of conversion is small. The X_to_zarr functions
are more appropriate for large datasets, since the expensive conversion step need only be
paid once.
After converting a file to Zarr format, it can be loaded with sgkit’s sgkit.load_dataset().
This is like Xarray’s xarray.open_zarr() function, with some useful defaults applied for you.
Similarly, the function sgkit.save_dataset() can be used to save the dataset in Zarr format.
This can be used to save a newly-loaded dataset, or a dataset with new variables that are the
result of running genetic methods on the data, so it can be loaded again later.
By default, Zarr datasets created by sgkit (and Xarray) have consolidated metadata, which makes opening the dataset faster.
BGEN#
The sgkit.io.bgen.read_bgen() function loads a single BGEN dataset as Dask
arrays within an xarray.Dataset from a bgen file.
The sgkit.io.bgen.bgen_to_zarr() function converts a bgen file to Zarr
files stored in sgkit’s Xarray data representation, which can then be opened
as a xarray.Dataset.
PLINK#
The sgkit.io.plink.read_plink() function loads a single PLINK dataset as Dask
arrays within an xarray.Dataset from bed, bim, and fam files.
The sgkit.io.plink.write_plink() and sgkit.io.plink.zarr_to_plink()
functions convert sgkit’s Xarray data representation to PLINK.
Working with cloud-native data#
TODO: Show how to read/write Zarr data in cloud storage
Datasets#
Genetic variables#
Most Genetic methods in sgkit operate on a few variables in an Xarray dataset. Variables have default names, so you can usually just pass in the dataset, but it’s also possible to use different variable names.
In [1]: import sgkit as sg

In [2]: ds = sg.simulate_genotype_call_dataset(n_variant=100, n_sample=50, missing_pct=.1)

In [3]: ds = ds[['variant_allele', 'call_genotype']]

In [4]: ds
Out[4]:
<xarray.Dataset> Size: 10kB
Dimensions:         (variants: 100, alleles: 2, samples: 50, ploidy: 2)
Dimensions without coordinates: variants, alleles, samples, ploidy
Data variables:
    variant_allele  (variants, alleles) |S1 200B b'T' b'C' b'C' ... b'T' b'A'
    call_genotype   (variants, samples, ploidy) int8 10kB 0 0 1 0 1 ... 0 1 0 0
Attributes:
    contigs:  ['0']
    source:   sgkit-unknown

# Use the default variable (call_genotype)
In [5]: sg.count_call_alleles(ds).call_allele_count
Out[5]:
<xarray.DataArray 'call_allele_count' (variants: 100, samples: 50, alleles: 2)> Size: 10kB
dask.array<count_alleles, shape=(100, 50, 2), dtype=uint8, chunksize=(100, 50, 2), chunktype=numpy.ndarray>
Dimensions without coordinates: variants, samples, alleles
Attributes:
    comment:  Allele counts. With shape (variants, samples, alleles) and valu...

# Create a copy of the call_genotype variable, and use that to compute counts
# (More realistically, this variable would be created from another computation or input.)
In [6]: ds["my_call_genotype"] = ds["call_genotype"]

In [7]: sg.count_call_alleles(ds, call_genotype="my_call_genotype").call_allele_count
Out[7]:
<xarray.DataArray 'call_allele_count' (variants: 100, samples: 50, alleles: 2)> Size: 10kB
dask.array<count_alleles, shape=(100, 50, 2), dtype=uint8, chunksize=(100, 50, 2), chunktype=numpy.ndarray>
Dimensions without coordinates: variants, samples, alleles
Attributes:
    comment:  Allele counts. With shape (variants, samples, alleles) and valu...
For a full list of variables and their default names, see Variables.
Methods declare the variables that they use directly. If the variable exists in the dataset, then it will be used for the computation.
If the variable doesn’t exist in the dataset, then it will be computed if the variable name is
the default one. For example, sgkit.count_variant_alleles() declares
call_allele_count as a variable it needs to perform its computation.
If the dataset doesn’t contain call_allele_count, then the method will
call sgkit.count_call_alleles() to populate it, before running its own computation.
# The following will create call_allele_count and variant_allele_count
In [8]: sg.count_variant_alleles(ds)
Out[8]:
<xarray.Dataset> Size: 32kB
Dimensions:               (variants: 100, alleles: 2, samples: 50, ploidy: 2)
Dimensions without coordinates: variants, alleles, samples, ploidy
Data variables:
    variant_allele_count  (variants, alleles) uint64 2kB dask.array<chunksize=(100, 2), meta=np.ndarray>
    call_allele_count     (variants, samples, alleles) uint8 10kB dask.array<chunksize=(100, 50, 2), meta=np.ndarray>
    variant_allele        (variants, alleles) |S1 200B b'T' b'C' ... b'T' b'A'
    call_genotype         (variants, samples, ploidy) int8 10kB 0 0 1 ... 1 0 0
    my_call_genotype      (variants, samples, ploidy) int8 10kB 0 0 1 ... 1 0 0
Attributes:
    contigs:  ['0']
    source:   sgkit-unknown
If however a non-default variable name is used and it doesn’t exist in the dataset, then the intermediate variable is not populated, and an error is raised, since sgkit expects the user to have created the variable in that case.
In [9]: sg.count_variant_alleles(ds, call_allele_count="my_call_allele_count")
---------------------------------------------------------------------------
ValueError                                Traceback (most recent call last)
Cell In[9], line 1
----> 1 sg.count_variant_alleles(ds, call_allele_count="my_call_allele_count")

File ~/work/sgkit/sgkit/sgkit/stats/aggregation.py:174, in count_variant_alleles(ds, call_genotype, call_allele_count, using, merge)
    114 """Compute allele count from per-sample allele counts, or genotype calls.
    115
    116 Parameters
   (...)    171        [4, 0]], dtype=uint64)
    172 """
    173 if using == variables.call_allele_count:
--> 174     ds = define_variable_if_absent(
    175         ds, variables.call_allele_count, call_allele_count, count_call_alleles
    176     )
    177     variables.validate(ds, {call_allele_count: variables.call_allele_count_spec})
    178     AC = ds[call_allele_count].sum(dim="samples")

File ~/work/sgkit/sgkit/sgkit/utils.py:280, in define_variable_if_absent(ds, default_variable_name, variable_name, func, **kwargs)
    278     return ds
    279 if variable_name != default_variable_name:
--> 280     raise ValueError(
    281         f"Variable '{variable_name}' with non-default name is missing and will not be automatically defined."
    282     )
    283 return func(ds, **kwargs)

ValueError: Variable 'my_call_allele_count' with non-default name is missing and will not be automatically defined.
There are also some variables that cannot be automatically defined, such as call_genotype,
since it can’t be computed from other data.
Dataset merge behavior#
Generally, method functions in sgkit compute some new variables based on the input dataset, then return a new output dataset that consists of the input dataset plus the new computed variables. The input dataset is unchanged.
This behavior can be controlled using the merge parameter. If set to True
(the default), then the function will merge the input dataset and the computed
output variables into a single dataset. Output variables will overwrite any
input variables with the same name, and a warning will be issued in this case.
If False, the function will return only the computed output variables.
Examples:
In [10]: import sgkit as sg

In [11]: ds = sg.simulate_genotype_call_dataset(n_variant=100, n_sample=50, missing_pct=.1)

In [12]: ds = ds[['variant_allele', 'call_genotype']]

In [13]: ds
Out[13]:
<xarray.Dataset> Size: 10kB
Dimensions:         (variants: 100, alleles: 2, samples: 50, ploidy: 2)
Dimensions without coordinates: variants, alleles, samples, ploidy
Data variables:
    variant_allele  (variants, alleles) |S1 200B b'T' b'C' b'C' ... b'T' b'A'
    call_genotype   (variants, samples, ploidy) int8 10kB 0 0 1 0 1 ... 0 1 0 0
Attributes:
    contigs:  ['0']
    source:   sgkit-unknown

# By default, new variables are merged into a copy of the provided dataset
In [14]: ds = sg.count_variant_alleles(ds)

In [15]: ds
Out[15]:
<xarray.Dataset> Size: 22kB
Dimensions:               (variants: 100, alleles: 2, samples: 50, ploidy: 2)
Dimensions without coordinates: variants, alleles, samples, ploidy
Data variables:
    variant_allele_count  (variants, alleles) uint64 2kB dask.array<chunksize=(100, 2), meta=np.ndarray>
    call_allele_count     (variants, samples, alleles) uint8 10kB dask.array<chunksize=(100, 50, 2), meta=np.ndarray>
    variant_allele        (variants, alleles) |S1 200B b'T' b'C' ... b'T' b'A'
    call_genotype         (variants, samples, ploidy) int8 10kB 0 0 1 ... 1 0 0
Attributes:
    contigs:  ['0']
    source:   sgkit-unknown

# If an existing variable would be re-defined, a warning is thrown
In [16]: import warnings

In [17]: ds = sg.count_variant_alleles(ds)

In [18]: with warnings.catch_warnings(record=True) as w:
   ....:     ds = sg.count_variant_alleles(ds)
   ....:     print(f"{w[0].category.__name__}: {w[0].message}")
   ....:
MergeWarning: The following variables in the input dataset will be replaced in the output: variant_allele_count

# New variables can also be returned in their own dataset
In [19]: sg.count_variant_alleles(ds, merge=False)
Out[19]:
<xarray.Dataset> Size: 2kB
Dimensions:               (variants: 100, alleles: 2)
Dimensions without coordinates: variants, alleles
Data variables:
    variant_allele_count  (variants, alleles) uint64 2kB dask.array<chunksize=(100, 2), meta=np.ndarray>

# This can be useful for merging multiple datasets manually
In [20]: ds.merge(sg.count_variant_alleles(ds, merge=False))
Out[20]:
<xarray.Dataset> Size: 22kB
Dimensions:               (variants: 100, alleles: 2, samples: 50, ploidy: 2)
Dimensions without coordinates: variants, alleles, samples, ploidy
Data variables:
    variant_allele_count  (variants, alleles) uint64 2kB dask.array<chunksize=(100, 2), meta=np.ndarray>
    call_allele_count     (variants, samples, alleles) uint8 10kB dask.array<chunksize=(100, 50, 2), meta=np.ndarray>
    variant_allele        (variants, alleles) |S1 200B b'T' b'C' ... b'T' b'A'
    call_genotype         (variants, samples, ploidy) int8 10kB 0 0 1 ... 1 0 0
Attributes:
    contigs:  ['0']
    source:   sgkit-unknown
Merge can be used to rename output variables too.
In [21]: import sgkit as sg

In [22]: ds = sg.simulate_genotype_call_dataset(n_variant=100, n_sample=50, missing_pct=.1)

In [23]: ds = ds[['variant_allele', 'call_genotype']]

In [24]: ds.merge(sg.count_variant_alleles(ds, merge=False).rename(variant_allele_count="my_variant_allele_count"))
Out[24]:
<xarray.Dataset> Size: 12kB
Dimensions:                  (variants: 100, alleles: 2, samples: 50, ploidy: 2)
Dimensions without coordinates: variants, alleles, samples, ploidy
Data variables:
    variant_allele           (variants, alleles) |S1 200B b'T' b'C' ... b'A'
    call_genotype            (variants, samples, ploidy) int8 10kB 0 0 1 ... 0 0
    my_variant_allele_count  (variants, alleles) uint64 2kB dask.array<chunksize=(100, 2), meta=np.ndarray>
Attributes:
    contigs:  ['0']
    source:   sgkit-unknown
Note that there is a limitation where intermediate variables (call_allele_count in this case)
are not returned if merge=False. See sgkit-dev/sgkit#405.
Interop with other Python libraries#
It’s usually easier to pass genetic data between Python libraries as simple NumPy arrays,
rather than saving them in files. In sgkit, any data variable can be computed and extracted
as a NumPy array using the .values property.
Genetic data is usually stored in a sgkit.variables.call_genotype_spec array
which has three dimensions (variants, samples and ploidy). This data structure can be
difficult to work with in generic statistical libraries and it is often necessary to
convert genotypes to a single value per call. The sgkit.convert_call_to_index()
method converts call genotypes into sgkit.variables.call_genotype_index_spec
which represents each call as a single integer value. For biallelic datasets, this
value is simply the count of the alternate allele. Genotype calls with missing alleles
will be converted to a -1.
In [25]: import sgkit as sg

# Simulate biallelic genotype calls
In [26]: ds = sg.simulate_genotype_call_dataset(n_variant=10, n_sample=8, missing_pct=.1, seed=0)

In [27]: sg.display_genotypes(ds)
Out[27]:
samples    S0   S1   S2   S3   S4   S5   S6   S7
variants
0         0/0  1/0  1/0  0/1  1/0  0/1  0/0  ./0
1         1/1  0/0  1/0  0/.  1/0  1/1  1/1  1/0
2         1/0  0/0  1/0  1/1  1/1  1/1  0/0  0/.
3         0/.  1/0  1/0  1/.  0/0  1/0  0/1  ./0
4         0/0  0/.  0/1  0/1  0/1  1/0  1/.  0/.
5         0/1  0/0  1/0  0/1  1/0  1/1  0/0  1/0
6         0/0  1/1  1/1  1/0  1/0  ./0  1/0  1/0
7         1/1  1/0  0/0  1/0  1/1  0/0  0/1  0/1
8         1/0  1/1  0/1  1/0  1/0  0/.  1/0  0/1
9         0/1  ./1  1/1  0/.  1/.  1/0  0/1  0/.

# Convert genotype calls into a numpy array of alternate allele counts
In [28]: sg.convert_call_to_index(ds).call_genotype_index.values
Out[28]:
array([[ 0,  1,  1,  1,  1,  1,  0, -1],
       [ 2,  0,  1, -1,  1,  2,  2,  1],
       [ 1,  0,  1,  2,  2,  2,  0, -1],
       [-1,  1,  1, -1,  0,  1,  1, -1],
       [ 0, -1,  1,  1,  1,  1, -1, -1],
       [ 1,  0,  1,  1,  1,  2,  0,  1],
       [ 0,  2,  2,  1,  1, -1,  1,  1],
       [ 2,  1,  0,  1,  2,  0,  1,  1],
       [ 1,  2,  1,  1,  1, -1,  1,  1],
       [ 1, -1,  2, -1, -1,  1,  1, -1]])
Custom naming conventions#
TODO: Show to use a custom naming convention via Xarray renaming features.
Adding custom data to a Dataset#
TODO: Show how something like sample metadata can be joined to an existing Xarray dataset. Also briefly explain indexing and uniqueness within Xarray/Pandas, since this is critical for understanding joins.
Methods#
Custom Computations#
TODO: Finish explaining how Numba works and how users might apply it
Here is an example that demonstrates an alt allele count:
In [29]: import numba

In [30]: import sgkit as sg

In [31]: import numpy as np

In [32]: ds = sg.simulate_genotype_call_dataset(5, 3, missing_pct=.2)

In [33]: def alt_allele_count(gt):
   ....:     out = np.full(gt.shape[:2], -1, dtype=np.int64)
   ....:     for i, j in np.ndindex(*out.shape):
   ....:         if np.all(gt[i, j] >= 0):
   ....:             out[i, j] = np.sum(gt[i, j] > 0)
   ....:     return out
   ....:

In [34]: numba.njit(alt_allele_count)(ds.call_genotype.values)
Out[34]:
array([[ 0,  1,  1],
       [ 1,  1, -1],
       [-1,  1,  2],
       [ 0, -1, -1],
       [ 1,  2,  2]])
PCA#
TODO: Describe the upstream tools for PCA (i.e. those in dask-ml/scikit-learn)
Deployment#
Deploying sgkit on a cluster#
For parallelism sgkit uses Dask to distribute work across workers. These workers can either be local processes or remote processes running on a cluster. By default, dask creates a local cluster with one worker thread per CPU core on the machine. This is useful for testing and development, but for larger datasets it is often necessary to run on a cluster. There are several options for this including:
Research institutions often use a job scheduler like Slurm, LFS or PBS to manage compute resources, so here is a worked example of using Dask Jobqueue to run sgkit on an LSF cluster. The process is similar for other schedulers, see the Dask Jobqueue documentation
The first step is to create a dask scheduler that sgkit connects to. It is often desirable to have this running in a separate process, in a python REPL or notebook, so that its scaling can be adjusted on the fly. This needs to be done on a login node or other machine that has job submission privileges.
from dask_jobqueue import LSFCluster
cluster = LSFCluster(
    cores=1,           # Number of cores per-worker
    memory="16GB",     # Amount of memory per-worker
    project="myproject",
    queue="myqueue",   # LSF queue
    walltime="04:00",  # Set this to a reasonable value for your data size
    use_stdin=True,    # This is often required for dask to work with LSF
    lsf_units="MB",    # This may very depending on your clusters config
    # Any bash commands needed to setup the environment
    job_script_prolouge="module load example/3.8.5",
    # This last line is useful to gracefully rotate out workers as they reach
    # the maximum wallclock time for the given queue. This allows a long-running
    # cluster to run on queues with shorter wallclock limits, but that likely
    # have higher priority.
    worker_extra_args=["--lifetime", "350m", "--lifetime-stagger", "5m"],
)
Now that the cluster is created we can view its dashboard at the address from
cluster.dashboard_link, at this point it will have zero workers.
To launch workers we can request a fixed amount with:
cluster.scale(10)
At which point the worker jobs will be scheduled and once they are running they will connect to the dask scheduler and be visible in the dashboard.
The other option is to let dask adaptively scale the number of workers based on the amount of task that are queued up. This can prevent idle workers when there are no tasks to run, but there may be a short delay when new tasks are submitted while the workers are being scheduled. To enable this we can use:
cluster.adapt(minimum=0, maximum=100, wait_count=120)
The minimum and maximum are optional, but it is recommended to set them to reasonable values to prevent the cluster launching thousands of jobs. The wait_count is the number of update cycles that dask will wait before scaling down the cluster when there are no tasks to run. By default the update interval is 1s so the above command will wait 120s before scaling down.
Now that the cluster is running we can connect to it from our sgkit code. The scheduler
address is available from cluster.scheduler_address. Then in your sgkit code pass this
value to the dask Client constructor:
import sgkit as sg
from dask.distributed import Client
client = Client("http://scheduler-address:8786")
# Now run sgkit code as normal
ds = sgkit.load_dataset("mydata.zarr")
ds = sgkit.variant_stats(ds)
Using GPUs#
TODO: Show CuPy examples
Troubleshooting#
Monitoring operations#
The simplest way to monitor operations when running sgkit on a single host is to use Dask local diagnostics.
As an example, this code shows how to track the progress of a single sgkit function:
In [35]: import sgkit as sg

In [36]: from dask.diagnostics import ProgressBar

In [37]: ds = sg.simulate_genotype_call_dataset(n_variant=100, n_sample=50, missing_pct=.1)

In [38]: with ProgressBar():
   ....:     ac = sg.count_variant_alleles(ds).variant_allele_count.compute()
   ....:

[                                        ] | 0% Completed | 207.60 us
[########################################] | 100% Completed | 100.44 ms

In [39]: ac[:5]
Out[39]:
<xarray.DataArray 'variant_allele_count' (variants: 5, alleles: 2)> Size: 80B
array([[50, 40],
       [40, 52],
       [48, 45],
       [37, 51],
       [45, 46]], dtype=uint64)
Dimensions without coordinates: variants, alleles
Attributes:
    comment:  Variant allele counts. With shape (variants, alleles) and value...
Monitoring resource utilization with ResourceProfiler and profiling task streams with Profiler are other commonly used local diagnostics.
For similar monitoring in a distributed cluster, see Dask distributed diagnostics.
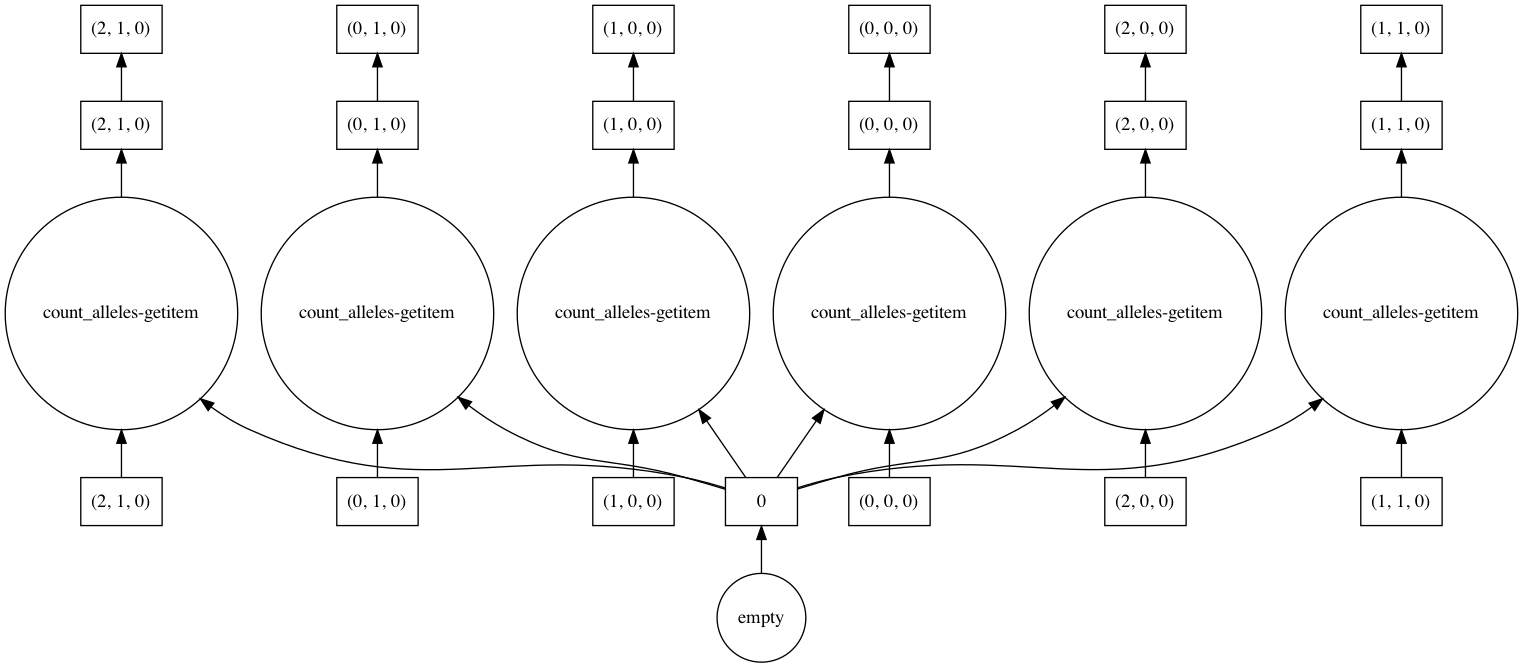
Visualizing computations#
Dask allows you to visualize the task graph of a computation before running it, which can be handy when trying to understand where the bottlenecks are.
In most cases the number of tasks is too large to visualize, so it’s useful to restrict the graph just a few chunks, as shown in this example.
In [40]: import sgkit as sg

In [41]: ds = sg.simulate_genotype_call_dataset(n_variant=100, n_sample=50, missing_pct=.1)

# Rechunk to illustrate multiple tasks
In [42]: ds = ds.chunk({"variants": 25, "samples": 25})

In [43]: counts = sg.count_call_alleles(ds).call_allele_count.data

# Restrict to first 3 chunks in variants dimension
In [44]: counts = counts[:3*counts.chunksize[0],...]

In [45]: counts.visualize(optimize_graph=True)
Out[45]: <IPython.core.display.Image object>
By passing keyword arguments to visualize we can see the order tasks will run in:
# Graph where colors indicate task ordering
In [46]: counts.visualize(filename="order", optimize_graph=True, color="order", cmap="autumn", node_attr={"penwidth": "4"})
Out[46]: <IPython.core.display.Image object>
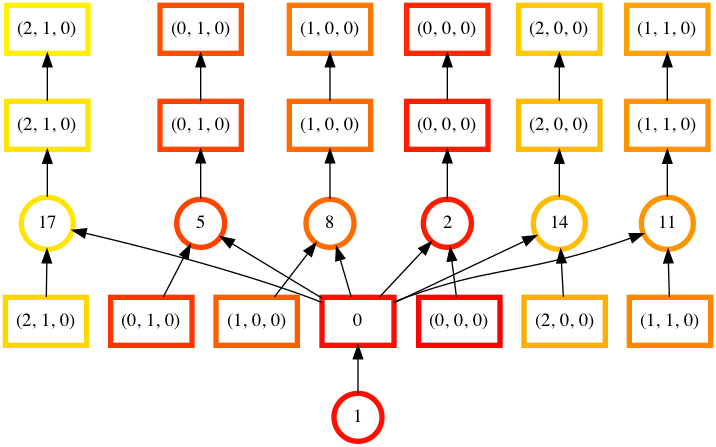
Task order number is shown in circular boxes, colored from red to yellow.
Disabling the Numba cache#
Internally, sgkit uses the Numba JIT compiler to accelerate some methods. These methods will be compiled the first time that they are used following a new installation. The compiled methods are automatically cached so that recompilation is not required in future sessions. However, this may occasionally cause issues with some setups.
Caching of compiled sgkit methods can be disabled by setting the environment variable SGKIT_DISABLE_NUMBA_CACHE to 1.
This variable can also be set from within a python session before loading sgkit.
In [47]: import os

In [48]: os.environ['SGKIT_DISABLE_NUMBA_CACHE']='1'

In [49]: import sgkit as sg
With caching disabled, these methods will be compiled the first time that they are called during each session. Refer to the Numba notes on caching for more information.